Finger Yarn Bracelet
Click here to download project sheet.
MATERIALS
- 4 yd. yarn - Jewel Box • 30033471, Tourmaline
- Optional: 4 yd. of embroidery floss and 4 mm. facet beads
DIRECTIONS
NOTE: These directions are for right-handers; left-handers would use the right hand to weave.
TO START:
Tie a loop knot at one end of the length of yarn. Slip the other end of the yarn into the loop and pull through leaving just a small adjustable loop. Slip this loop over your left thumb to anchor the yarn. With the palm of your left hand facing you and starting from the thumb, weave the yarn through your fingers in this order:
Yarn in front the index finger, wrap around the back of the middle finger, wrap in front of the ring finger and wrap around the back of the pinkine and coming back around the front of the pinkie.
Now go back in the other direction: Wrap around the back of the ring finger, wrap in front of the middle finger, wrap around back of index finger and bring the length of the yarn to the front of the palm. Lay the yarn across the palm going from index finger to the pinkie.
Loosen the loop around the index finger and pull the loop over the yarn and over the top of your finger. Let the loop rest on the back of your hand. There should still be a yarn loop going across the index finger. Go to the middle finger, pull that loop over the finger the same way. Repeat for the ring finger and pinkie. Each finger from index to pinkie should still have a loop at the bottom.
Now lay the yarn length over your fingers going from pinkie to index finger. Starting from the pinkie, pull the loop over the yarn and over the finger. Repeat this step for all fingers. Again there should be a loop over the bottom of all the fingers. Now, lay the yarn across the fingers going from index finger to pinkie. Again, pull the loops over the yarn and over the top of your fingers. Repeat laying the yarn across your finger, switching directions each time, then pulling the yarn over until you reach about 3 in. from the end of the yarn.
Depending on which side you end on (pinkie or index finger) start from the opposite end of the end of the yarn. Pull the loop over your finger and place the loop onto the finger right next to it. Pull that loop over and place onto the finger next to it and go down the line. At the end, slip the end of the yarn into the last loop to secure.
With all the loops off of your fingers, remove the loop from your thumb. Hold onto the ends of the yarns and slowly pull the two ends. The loops will curl and start to look like a woven chain. Tie the ends of the yarns together to form the bracelet. Cut off the excess yarn.
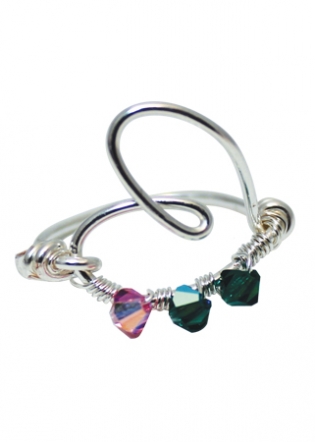
Optional: you can experiment with different yarns, cords or even embroidery floss. You can also slip on beads as you weave the bracelet as in the sample shown.
SHARE: