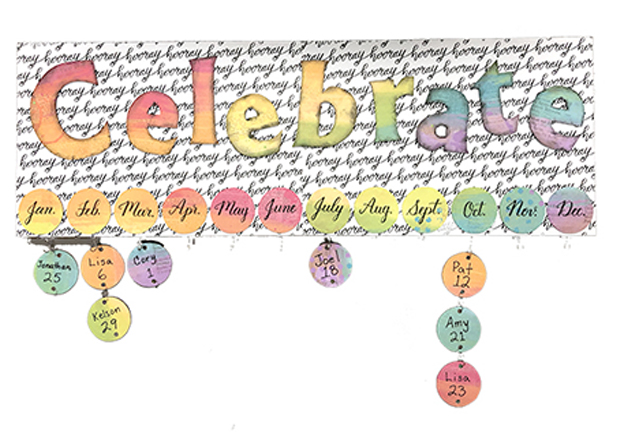
Celebrate Board (Perpetual Calendar)
Click here to download project sheet.
MATERIALS
SUPPLIES
- 8” x 24” Canvas #30042583
- 2 – 12” x 12” for canvas background
- (The sample uses Stay Colorful Let’s Boogie #30196697 and Bo Bunny Believe Marvelous #30172636)
- Kelly Creates stamp set – months #30196638
- Clear block for stamping
- Versa Fine Ink Pad – Black #30025144
- 2 or more 12pc. package of Chipboard circles- 1 7/8” #30151273
- Crazy Tackz – clear #30125991 or pushpins or hooks
- 7mm Jump rings #30102573
- Chipboard letters for templates:
- C #30137118
- E #30137120
- L #30137127
- B #30137117
- R #30137133
- A #30137116
- T#30137135
- Eyelets – coordinating color
- 1/4” Meriken Double Stick Tape #30013284
- Turbo Tacky Glue #30172712
- Foam Pop Up Dots #30103261
- Marker – black for writing name/dates
- Optional: Glossy Accents, varnish or similar for coating the board and tags.
TOOLS
- Crop-a-Dile punch and eyelet setter #30067868
- Paper trimmer
- Scissors
- pencil for tracing
- Jewelry pliers
NOTE: There are many ways to make this project. You can paint the canvas and wording, you can use wood boards with wood burning and adding fancy metal hooks. The possibilities are only limited by your imagination!
DIRECTIONS
INSTRUCTIONS
Celebrate Board
- Take the two 12” x12” paper for the background and cut down to 8” high. Place on the canvas and tape down.
- Glue the chosen paper to 12 of the chipboard circles with the Turbo Tacky Glue or double stick tape. Use the Kelly Creates abbreviated month stamps and stamp months onto the circles.
- Depending on what you are using for the hooks, line up the hooks along the bottom of the canvas. Place the circle months above, evenly spacing them along the bottom of the canvas. Adhere hooks and glue circles in place.
- Take the chosen paper for the “Celebrate” word and place the chipboard letters on the back of the paper for tracing. REMEMBER to place the letters backwards onto the paper when tracing. Trace and cut out 1- C, 3-e’s, 1- b, 1-r, 1-a, 1- t. On the sample, we used the ink pad and distressed the edges of the letters to give them definition. Arrange the letters onto the canvas and adhere them with pop dots to raise them.
Name/Date Tags
- Figure out how many people/dates you want to add to your board. Cover that number of circles with paper. You can also distress the edges with ink if you want to. Use the Crop-a-dile to punch a hole at the top and bottom of the circles. Set in the eyelets in the holes. Write the names and day of the month for the occasion you are celebrating (birthdays, anniversaries, etc.)
- Use the jewelry pliers to add jump rings to the tags and join tags together. Place tags under the appropriate month for the celebration.
SHARE: